Match Groups
What is a Match Group?
A Match Group defines which records are assigned to which users. Records that match the Match Rules are assigned according to the selected Operational Mode (e.g. Round Robin or Load Balanced), to the Assignees in the Match Group. Optionally, a Match Group contains a Capacity Model or SLAs as well.
Use multiple Match Groups to cater for complex scenarios where records need to be funneled to different teams. Set a priority ranking if you have several Match Groups that can match the same records, to indicate which Match Group should try to process the record first. Add Overflow to set up a backup group in case no assignees are available in the main group.
When records match to a Match Group, you will see the assignment audit trail in the Match Logs.
Greedy Match Groups
A Match Group with no Match Rules configured is considered “greedy”: it will match any record that it processes for its Object, and assigns it to the Assignees in that Match Group. It can be useful to create a greedy Match Group to catch any records that couldn't be matched by other Match Groups. In that case, set the Priority of the greedy Match Group to last place. Otherwise it will catch all records before other Match Groups have had a chance.
Getting Started with a Basic Match Group
The sections 'Creating a Match Group' and 'Configuring a Match Group' below discuss all options available in a Match Group's settings. A number of settings are optional and not needed in order to start with your first Match Group.
To quickly get started with just one or two basic Match Groups, follow the steps in the Quick Setup Guide instead. You can always expand your Match Groups later on.
Setting up a Match Group
Set up a Match Group in three steps:
- Create the Match Group: configure the Match Group settings.
- Configure the Match Group: add elements such as Match Rules, Assignees, and more.
- Activate the Match Group.
Creating a Match Group
The steps for creating a Match Group briefly describe the use of each field. For more detailed information, see the 'More Info about the Match Group settings' section at the end of the page.
Clone an existing Match Group
If you have a Match Group that differs just a little bit in how you want to set up your new Match Group, you can clone it and make changes, instead of creating a new Match Group from scratch.
Open the existing Match Group and click Clone  at top right. This will copy almost all settings of that Match Group to the new Match Group. Make adjustments where needed and save the new Match Group. Find out more in this video.
To create a new Match Group:
- In Plauti Assign, go to tab Assign Setup Match Groups.
- At top right, click New
 .
.
General Settings
- Leave the Active toggle at inactive for now.
- Enter a descriptive Name and Description for the Match Group, for future reference.
Object Settings
- Select the Object whose records will be routed by this Match Group. For example, enter 'Contact' to route Contact records with this Match Group.
- At Assignment Field, indicate in which user lookup field the Assignee should be entered. Usually this is the 'Owner ID' field. The Match Group assigns records to the user in this field.
Routing Settings
For more detailed information about these settings, see the 'More Info about the Match Group settings' section below.
- Set an Operational Mode to determine how records will be distributed amongst the Assignees. Round Robin and Load Balanced are the two most used options; for Load Balanced you also need to specify a Capacity Model.
- If you picked 'Operational Mode: Distance': configure the Distance fields that appeared when you picked Operational Mode: Distance:
- At Latitude Field, enter the field on the Object that contains its latitude.
- At Longitude Field, enter the field on the Object that contains its longitude.
- Enter a Maximum Distance in miles (optional) to the Assignee's location.
- Set a Priority to determine the matching order if you have mutually non-exclusive Match Groups with regard to Match Rules. Records will be matched against the Match Group with priority "1" first; if they do not match all of that group's Match Rules then the group with priority "2" is tried, etc.
- Select a Queue User. If all Assignees happen to be unavailable, records will be temporarily parked with this user until an Assignee becomes available again.
- Select a Rejects User(optional) who will review records that were rejected by Assignees.
- Toggle Overflow to the next Match Group(optional) to proceed records to a backup Match Group if all Assignees of a MatchGroup are unavailable or at capacity, as an alternative to the Queue User feature.
- Toggle Check Existing Records(optional) if you want to assign records that belong together (e.g. Leads from the same Account) to the same Assignee.
Additional Settings
Toggle Assignee Synchronization(optional) to automatically synchronize the Assignees of this Match Group according to the Assignee Rules. Read more below in the 'Dynamic Assignees' section.
Toggle Adjust Capacity During Bulk Transactions to determine whether user load should be recalculated during bulk transactions for this Match Group, or only afterwards. This is part of the Capacity Models configuration. Read more in Adjust Capacity during Bulk Transactions.
Enter a Custom Email Template(optional) if you want to send customized emails to Assignees. Enter the Unique Template Name of a Classic Email Template. Read more below about the requirements for the template.
Use the Update Fields On Assignment field (optional) to change the value of certain fields when a record is assigned via this Match Group. Enter field:value pairs with syntax:
"Example_Field__c":"Example Value","Another_Field__c":"Another Value"Read more in Update Specific Record Fields Upon Assignment.
Click Save.
Read more about these settings below, in the "More info about the Match Group settings" section.
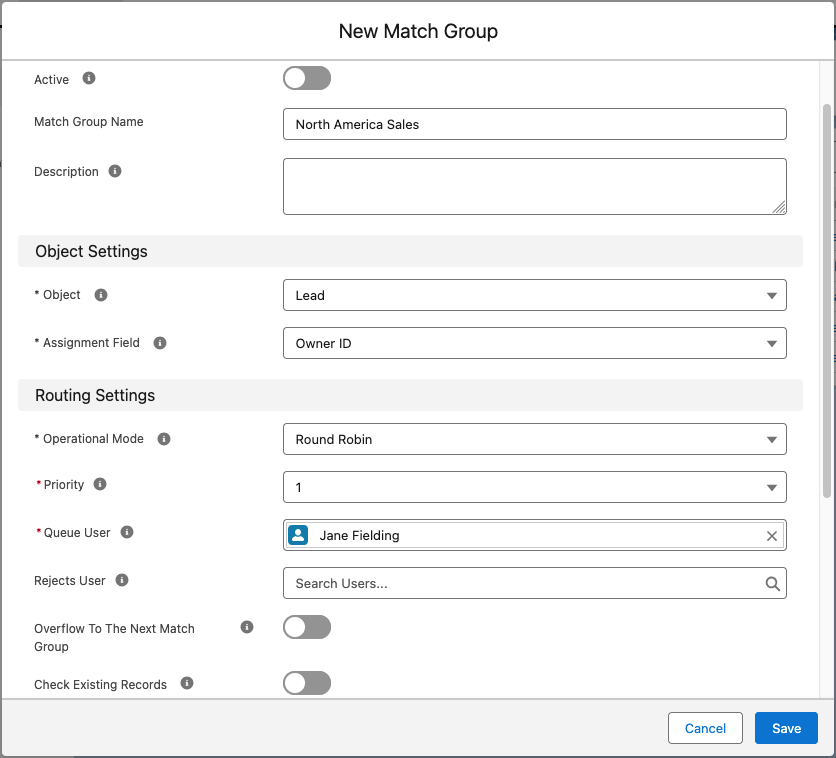
A new Match Group with a basic configuration to start out with
Configuring a Match Group
After saving, the new Match Group's page appears. The Match Group is now listed in the Match Groups overview as well.
Configure the Match Group on its subtabs: 'Match Rules', 'Assignees', etc.

**Match Rules
**
At the Match Rules subtab, click Add
 (optional) to define which records should be routed by this Match Group. If you do not set any Match Rules, the Match Group will route all records of the set Object.
Read more about the fields and workings in Match Rules.
Toggle the Match Rule to Active, or Not Active if you do not want to use it yet.
Enter a descriptive Rule Name.
Select a Field from the Object or a related object.
Add an Operator, and invert if needed by toggling 'Apply not operator'.
Enter the Value that the selected field should have in order for the record to be routed by this Match Group.
See Match Rules and Examples of Different Field Types in Match Rules for more details.
Click Save.
e Match Rule is added to the MatchRules list.
If you have more than one Match Rule, add Match Rule Logic to determine how the Match Rules should be applied. Click Edit Logic
 to change the logic settings.
Assignees
Assignees are the users that each get a record assigned in turn. If a user should be an assignee in multiple Match Groups, they will have a separate Assignee record in each Match Group. The settings for these Assignees can differ per Match Group.
Add Assignees to the Match Group:
- manually, on the Assignee subtab, and/or
- dynamically, with an AssigneeRule on the Dynamic Assignees tab.
Add Assignees Manually
On subtab Assignees
The Assignees you add manually will not be synchronized by the Assignee Rules.
The settings below are explained more in-depth on the Assignees page.
On subtab Assignees, click Add
 .
.Toggle Active. Inactive Assignees will not be assigned records.
At User, enter the user that the Assignee will be associated with.
At Capacity Threshold, enter the threshold for this assignee's capacity as defined by the Capacity Model associated with this MatchGroup. Leave empty if you are not using Capacity Models.
At Distribution Ratio, set a distribution or assignment ratio for the number of records this assignee is to receive relative to the other assignees in the MatchGroup.
Toggle Do Not Assign When Calendar Busy / OOO / Omni Away if you don't want the Assignee to receive records when they are marked as not available.
Toggle one or more Notifications options to notify the Assignee of newly assigned records. Read more in Send notifications on assignment.
The CC Email Address can be used for testing the email notifications.
The Number of Bonus records to award can be used to direct some extra records to the Assignee in addition to their regular assignment rotation. Read more in Award Bonus Records.
Click Save
 .
.
The Assignee is added to the Assignee(s) Linked to this Match Group overview, with 'Dynamic Assignment' set to Manual. They can now be assigned records via this Match Group.
Add Assignees Dynamically
On subtab Dynamic Assignees
In order to add Assignees dynamically (optional), set up one or more Assignee Rules. When applied, Assignee Rules will add assignees to the Match Group if they match the criteria set in the rules, or remove them if they do not match anymore. Read more in Assignee Rules.
- At the Dynamic Assignees subtab, click Add
 .
.Enter a descriptive Rule Name for the rule.
Toggle the AssigneeRule to Active, or Not Active if you do not want to use it yet.
At Type, decide if Assignees should be selected by their User record, Collaboration Group, Group, or Skill.
Select a Field from the user's record, group or skill to filter Assignees on. For Skills you generally select the Name field.
Add an Operator, and invert if needed by toggling 'Apply not operator'.
Enter the Value that the selected field should have in order for users to be added as Assignee.
Read more about the options for the Value field in AssigneeRules.
Click Save.
The rule is added to the Dynamic Assignee Rules overview.
- If you have more than one AssigneeRule, add Assignee Rule Logic to determine how the Assignee Rules should be applied, by clicking Edit Logic
 .
. - Click Preview Record Selection
 to get an impression of which users will be added as Assignees when applying the Assignee Rules.
 - At the Assignee Settings section, click Edit
 to configure settings for dynamic assignees. All Assignees that are added with the Assignee Rules will have these settings. Read more in Assignees.
 - In the Dynamic Assignee Rules section, click Apply Rules and Settings
 to add all users, that currently meet the set Assignee Rules, as Assignees to the Match Group. They will all be configured according to the Assignee Settings in the section below. Dynamically managed Assignees that do not meet the Assignee Rules anymore will be removed from the Match Group.
 - If you want your Assignees to be updated by the Assignee Rules fully automatically, enable Assignee Synchronization (optional) on the Match Group's Settings subtab. This will ensure the Assignee Rules are applied, and Assignees are synchronized, each hour.
The Assignees are added to the 'Assignee(s) Linked to this Match Group overview' on subtab Assignees, with 'Dynamic Assignment' set to Dynamic. They can now be assigned records via this Match Group.
Capacity Models
If you want to cap assignment of records based on a custom definition of user 'capacity', (or the inverse, load,) add a Capacity Model here. This is mandatory if you set the Operational Mode to 'Load Balanced'. Read more in Using Capacity Models to Cap Assignment.
On subtab Capacity Models of the Match Group, click Add
 .
.Click Link Existing to link an existing Capacity Model (available via Capacity Models in the left hand menu), or Create New to create a new one.
The Capacity Model is added to the 'Capacity Model(s) used by this Match Group' overview.
Make sure the Assignees on tab Assignees have a Capacity Threshold set if needed.
Service Level Agreements
If you want to apply one or more SLAs (Service Level Agreements) to the records assigned via this Match Group, add them here. Read more in Using the Service Level Agreement (SLA) Feature.
On subtab Service Level Agreements of the Match Group, click Add
.Click Link Existing to link an existing SLA (available via Service Level Agreements in the left hand menu), or Create New to create a new one.
The SLA is added to the 'Service Level Agreement(s) linked to this Match Group' overview.
Match Logs
Find the Match Logs of a Match Group on subtab Match Logs. Read more in Logs and Reports.
Settings
The Match Group settings that were configured when the Match Group was created (see above at 'Creating a Match Group') can be edited here. Find more detailed information about the Match Group's Settings below.
Don't add Admins
Unless you want Admins (System Administrators or users in the SRR Admin permission set) to actively participate in processing the assigned records, do not add them to a MatchGroup as Assignee. You might run into problems if at some point you want to remove them again from the MatchGroup.
Read more in Plauti Assign cannot be accessed anymore.
Assignees and licenses
An SRR license is automatically allocated to every user that you add as an Assignee, either dynamically via the AssigneeRules, or manually. Each user will be assigned the SRR User permission set as well.
Activate the MatchGroup
Once you're done setting up the Match Group and are ready to start routing records with it, make sure to activate it:
| 1. Make sure the selected Object is set to be processed by Plauti Assign. 1. In the left hand menu, click Object Configuration. 2. Check that the Object is toggled to Active; if not, click Configure to update. 2. In the MatchGroup, at top right, click Activate  . .The 'Activate' button changes to 'Deactivate', indicating the Match Group is now active and will start assigning records. |
As your Org and sales processes get more sophisticated, Plauti Assign helps you keep it all automated: create more Match Groups with Match Rules to specify where subsets of records are routed.
Create Match Groups based on how you segment your records and which teams are responsible.
More info about the Match Group settings
Find more detailed information about the Match Group's Routing and Additional Settings below.
| Operational Mode | The way records that match with this Match Group are divided over the Assignees. - Round Robin: each new record is assigned to the next Assignee in the list. When the last Assignee in the list is reached, the next record goes to the first Assignee in the list again. This is the standard distribution method. - Load Balanced: here the number of records already assigned to Assignees is taken into account when assigning new records. This option requires you to also specify a Capacity Model. Learn more about Load Balancing in Operational Mode: Load Balanced. - Distance: assign records based on the physical locations of the record and the assignee. Each record is assigned to the closest assignee available. Read more in Operational Mode: Distance. - Plugin: assign records based on additional rules you define in an Apex Class. Read more in Operational Mode: Plugin. - Do Not Reassign is used if you wish for things like SLAs and Match Logs to be created, but for the record to not be reassigned. Or in a low-priority Match Group to catch the left-over records that are only a weak match, and decide manually on how to process them. Only use 'Do Not Reassign' when the Assignment Field is 'OwnerId'. |
| Priority | Determines which order the Match Groups are evaluated in. Priority 1 Match Groups are evaluated first. You only need to set different Priority values if your Match Groups are not mutually exclusive with regard to their Match Rules. Read more about Priority in MatchGroups: Priority and Overflow. |
| Queue User | When no Assignees are available for a Match Group (e.g. due to Out of Office or outside the set working hours), and 'Overflow to the next Match Group' is disabled, records are assigned temporarily to this Queue User. Plauti Assign will reassign to an Assignee when they become available again. The Queue User will not work on records themselves, so it could also be a system administrator. |
| Rejects User | If an Assignee rejects a record, for example because it is spam or a dud record, the rejected record is reassigned to this user. After review they may want to delete the record or reassign it. Leave this field blank if you don't want rejected records to be reassigned. The Assignee will still get a rejection credit. Read more in Rejecting Bad Leads, Cases or Other Records. |
| Overflow to the next Match Group | Use this option to manage cases where all Assignees of a Match Group are unavailable or at capacity, as an alternative to the Queue User feature. Overflow Logic will automatically move records to the next suitable Match Group. Read more in Overflow Records to the Next MatchGroup. |
| Check Existing Records | This will match Leads or Accounts in this Match Group against existing Leads, Accounts and Contacts. If an existing record matches, then its owner will be assigned to the incoming Lead or Account record. Read more in Match Existing Records. |
| Custom Email Template | Enter the 'Template Unique Name' of your custom Classic Email Template here. The template must be saved in the 'SuperRoundRobin' folder (Salesforce Setup > Classic Email Templates > folder: SuperRoundRobin). If you use merge fields in this template, make sure they correspond to the object named in the 'Object' field of the Match Group. I.e. if this is a Match Group for the Account object, a template that uses Lead merge fields won't work properly. Read more in Customizing the Email Alerts. |