Duplicate Check can take up some storage space in your Salesforce Organization. One way to clear up storage space is by deleting old jobs from the Job Overview. Once you have reviewed and merged your duplicate records, delete the job from the overview.
You can delete jobs in several ways: delete a single job, select jobs to delete from the overview, or filter out jobs to delete based on certain characteristics (e.g. created before a certain date).
Delete single jobs, and individual runs of scheduled jobs, via the Job Overview.
Scheduled jobs can be deactivated and deleted in the Scheduled Job Overview.
Delete a single job
To delete one job:
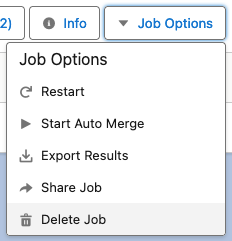
- Go to tab DC Job.
- Find the job you want to delete.
- At right, click Job Options > Delete Job.
- In the confirmation window, click Delete.
The job has been deleted. Any unprocessed records in the job will remain untouched.
Delete selected jobs
To delete a number of jobs from the job overview:
- Go to tab DC Job.
- Find a job you want to delete.
- Check the box in front of the job.
Extra Delete options appear at the top of the overview. - Select more jobs to delete, or click Select All
 to select all jobs visible on the page.
 - Click Delete Selected Jobs
 to delete the selected jobs.
 - In the confirmation window, click Delete.
The jobs have been deleted. Any unprocessed records in the jobs will remain untouched.
Filter and delete jobs in batch
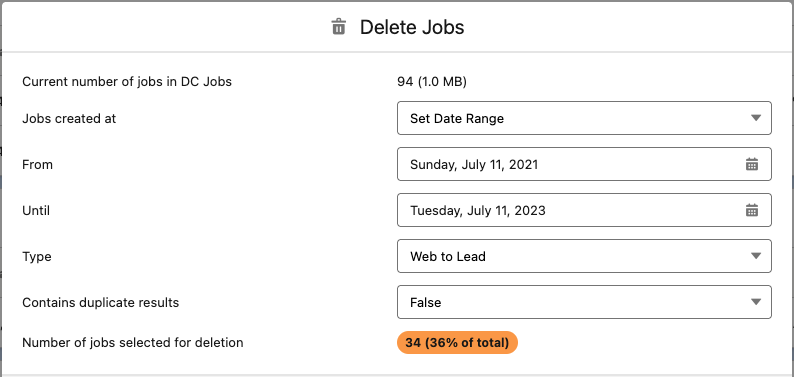
To delete a number of jobs based on certain job characteristics:
- Go to tab DC Job.
- At top right, click Delete Jobs
 .
. - Enter the desired specifications, such as a date range, job type, or whether the jobs still contain duplicate results or not.
- Click Delete.
The jobs have been deleted. Any unprocessed records in the jobs will remain untouched.
Delete Scheduled Jobs
Single runs of scheduled jobs are deleted as described above, via the Job Overview.
To stop a scheduled job from running more jobs in the future, go to the Scheduled Job Overview and deactivate or delete it there.
- Go to tab DC Job.
- Click the Down
 arrow next to the Job Overview header to switch to the Scheduled Job Overview.
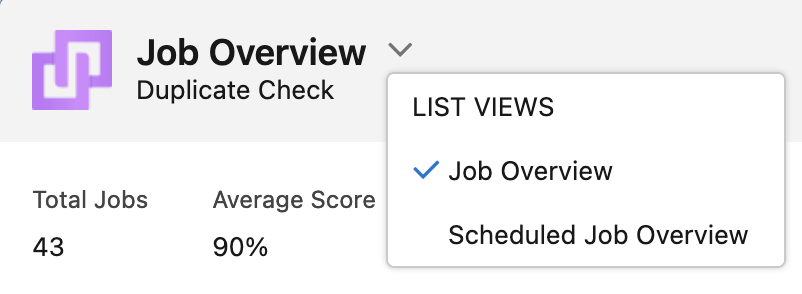
- At the right of the scheduled job you want to stop, click Job Options.
- Select Deactivate to stop a scheduled job from running but keep its configuration.
- Select Delete to delete the scheduled job.
Finished runs of the job, listed in the DC Job Overview, will not be deleted this way; switch back to the Job Overview to delete these runs there.
